Tuesday, May 8, 2012

Ripple, BB 10 WebWorks and 'Please enter a valid application id' error

You're developing an application for BB 10 using HTML5, Ripple emulator (for running & debugging your application in Chrome browser) & BlackBerry 10 WebWorks SDK (my version was 1.0.0.7).

Once you set up build settings and click 'Package' button to produce output you get the following error message:

Oh Snap! Build request failed with message: [ERROR] Error: Please enter a valid application id


Go to your application source directory and check the contents of config.xml file. Pay attention to the <widget> opening tag:
 <widget xmlns="http://www.w3.org/ns/widgets" 
        xmlns:rim="http://www.blackberry.com/ns/widgets" 
        version="1.0.3" 
        rim:header="RIM-Widget:rim/widget"
        id="SketchPad">

Possible causes for the error:
  1. Missing id tag
  2. White spaces in id tag value (registered issue)
As it turned out, WebWorks samples had the id value missing which was leading to build error when using Ripple.

Thursday, April 26, 2012

Ordered test execution error when using Test Manager/TFS

Background:

You've got TFS 2010 Server installed on a virtual machine and fully prepared for building and running automated tests (Build controller, Test Controller, Test Agent are installed and up&running, Build definition is created within TFS etc.).

You've got a test case which has associated automated ordered test. In Microsoft Test Manager this test case is added to a test plan which is set up for automated test runs (Test settings, Test Environment, Build are defined).


The associated with the test case ordered test file resides in a sub folder within the test project, not under root:


Issue:

When you run the test case from Test Manager (started on your work station & connected to remote TFS server) you get an 'Error' state (not 'Failed') for the test and the error message says: Cannot find the test ‘XXX’ with storage ‘..\bin\debug\YYY.dll’

The issue is due to Test Agent searching wrong folder for the tests DLL in case ordered test is not under root.

Resolution:

Put the ordered test file under project root and DLL folder will be resolved correctly.

Monday, February 27, 2012

ASP.NET MVC 3: Call Controller from external assembly

I've recently encountered a task to have pluggable controllers so that you could change web application behavior without source code recompilation. The idea was to update an assembly in the /Bin folder, possibly put/update some views under web application root folder and get new behavior in place.

As it turned out ASP.NET MVC 3 standard controller factory is pretty smart and may automatically search for controllers in all assemblies under /Bin folders (under web app root) and load them - for the simple case described there's no need to use any IoC container, MEF or other 3rd parties.

In order to obtain a working external assembly controller you have to:
  • Create a class library and reference System.Web.Mvc
  • Add controller class and fill in logic
  • Put the outpy DLL to web application /Bin folder. Application will be restarted. While debugging you may reference the class library with the controller to get it automatically copied to /Bin folder.
  • Put the view file(s) for action(s) defined in the controller to web application folder.

Views for the actions within external controller will be resolved according to standard ASP.NET MVC rules and searched under /Views folder (until you start defining full view paths in action methods).

In case you have 2 DLL's in the been folder which contain controller classes with same names then default routes will fail and upon request to action within controller name non unique an error will occur. In order to resolve conflicts you need to amend route table in global.asax and explicitly pass namespaces to be used for controller classes resolution (assuming we have same controllers in ExternalAssembly.Controllers and ExternalAssembly2.Controllers the first will take precedence):

        public static void RegisterRoutes(RouteCollection routes)
{
routes.IgnoreRoute("{resource}.axd/{*pathInfo}");

routes.MapRoute(
"Default", // Route name
"{controller}/{action}/{id}", // URL with parameters
new { controller = "Default", action = "Index", id = UrlParameter.Optional },
new[] {"ExternalAssembly.Controllers"}
);
}

Friday, February 24, 2012

Bilateral filter has been added to AForge.NET

Starting from version 2.2.4 AForge.NET contains Bilateral filter:
http://www.aforgenet.com/news/2012.02.23.releasing_framework_2.2.4.html

Use AForge.Imaging.Filters.BilateralSmoothing class.

Friday, February 10, 2012

Bilateral effect for Paint.NET

I've created and published Paint.NET effect plug-in implementing bilateral filtration. You may find it on Codeplex project page (so as installation instructions). Now you can easily use the filter while working with you photos and images.


More information on the filter and it's parameters can be found here.

Friday, January 27, 2012

Bilateral image filter: .NET implementation

UPDATE 24.02.2012: Starting from version 2.2.4 AForge.NET contains Bilateral filter:http://www.aforgenet.com/news/2012.02.23.releasing_framework_2.2.4.html.

In the previous post you may find an overview of bilateral image filtering and sample results it can produce. In this post you'll find out about my implementation and links to the files.

The first thing to mention is that my implementation relies on AForge.NET (version 2.2.3) framework which is a massive framework for image and video processing, solving AI and recognition tasks etc. One of the framework parts is dedicated to image processing and the filter fitted it pretty well.

If you don't use AForge.NET and don't want to download the full library then you may use an archive from here. Since only a small part of AForge.NET is used you'll need to reference 3 assemlblies:
  • AForge.dll
  • AForge.Math.dll
  • AForge.Imaging.dll

The acrhive contains the following folders:

  • FilterDemoExecutable - compiled demo of a filter. It's based on AForge.NET filter demo so it also has a large number of other AForge filters. The differences are: Bilateral filter, saving files, copy the processed image to clipboard.
  • FilterDemo - source for the above application.
  • Release - all assemblies required (as listed above)
  • Sources - solution with AForge.Imaging.dll sources which includes Bilateral filter (class AForge.Imaging.Filters.Smooting.Bilateral). Other AForge.NET projects are not included so ignore the warning you'll get upon opening the solution.

If you are already using AForge.NET then simply add the following .cs file to your project and that would be enough.

If you'd like to play with a demo application only then go here.

Thursday, January 26, 2012

Bilateral image filter: Edge preserving blur and noise reduction

Bilateral filter seems to be a very underestimated image improving technique. It's not frequently met across internet. The filter may help with solving the following tasks:
  • Noise reduction - pretty utilitarian & usual goal. When you have photos pictured with high ISO or within poor lighting conditions noise reduction will give them a more natural look
  • Sharpen edges
  • Great artistic effects - my favorite part, images processed with bilateral filter get an appealing glossy look
In this post I'll try to briefly describe the concept of the filter (in simple words without much math) and present a number of samples showing results that can be achieved.

The next post presents a .NET implementation of the filter.

The genuine article on the filter can be found here.

How it works

Let's start with a sample. Bellow you may see three images (taken from the original article):
  • The first (from left to right) is the original photo of a red jacket against blue sky, lots of noise.
  • The second image was received after Gaussian blur (that filter can be found in Photoshop and I assume in almost any other photo editor), the edge is blurred while no noise at all.
  • The last image is processed by bilateral filter, the edge is sharper, noise is removed.
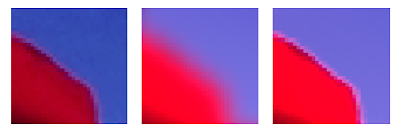
The above sample is a good demo of the Bilateral filter concept: it blurs only similar areas (domains) while bypassing contrast transitions (edges).

To be more precise Bilateral filter does a pixel-by-pixel evaluation and calculates the color for a specific pixel depending on the colors of surrounding pixels. The influence on the result is determined by the similarity of the surrounding pixels to the processed pixels. There're 2 criteria which define the similarity and "weigh coefficient" for a specific pixel (how much it puts into the result):
  • Spatial closeness, i.e. distance between 2 pixels, the further specific pixel stands from the resulting the less it influences it
  • Color closeness - color difference, black and white are "color distant", so as red and blue (in RGB model) . Due to considering this criterion we get edge preserving, red pixels do not influence blue ones and the edge between areas stays sharp

Assume we do the pixel-by-pixel processing in Gray scale image (one pixel = one byte). For each pixel being calculated we operate with numeric values in range [0;255]. The value for the resulting pixel is calculated as a weighted mean of surrounding pixels were weight is determined by pixel color and spatial functions.

The formula for calculating pixel value is as follows:

where Px,y - pixel value being calculated, Pi,k - one of the pixels in the surrounding area (kernel), n - surrounding area size (kernel size), Fcolor - function that determines color closeness, Fdistance - determines spatial closeness.

Fcolor, Fdistance are the functions which define the results produced by the filter. They are exponent functions and details on the internals can be found in the article describing bilateral filter. Since it's an iterative algorithm a limited number of pixels takes part in calculation which is determined by the surrounding square (kernel).

The important thing is that there're 3 parameters which influence the functions & algorithm and thus the results. The parameters are positive integral numbers:

  • Color Factor - the greater the number is, the greater are the domains and less contrast edges will get blurred.
  • Spatial Factor - the greater the value is the more blurry effect you'll get in domains, i.e. in areas of the same color.
  • Kernel Size (n) - this is an odd number > 1 (3, 5, 7, ...). It limits the set of pixels which take part in computation. This parameter influences performance (large values > 21 can slow the process dramatically) and the general "power" of the filter (low values < 5 on high resolution images may not produce any noticeable results).

Bellow you may see another example of bilateral filter being applied to RGB image. The approach is exactly the same as described above but in this case each channel values for a specific value is calculated separately (instead of one value for gray scale image 3 values are calculated for a pixel):
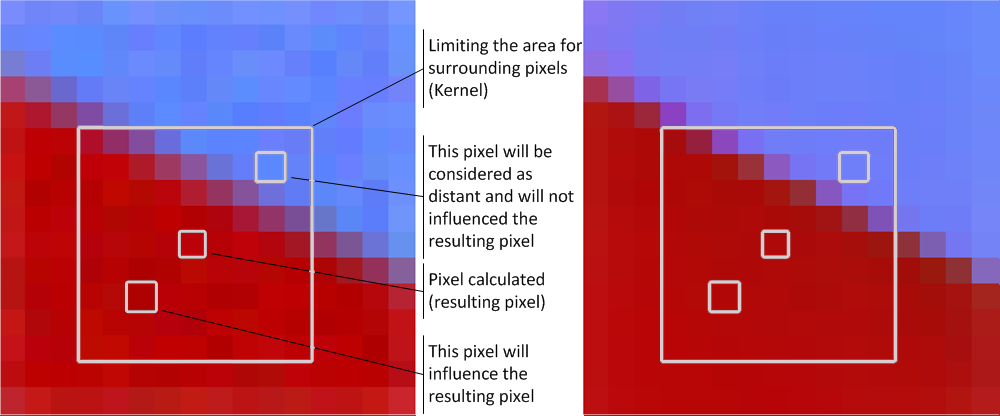


Filter parameters influencing the output

Bellow you'll find an original image and a grid depicting how the image is changed by the filter depending on specific parameter values, kernel size is 7 and is constant:

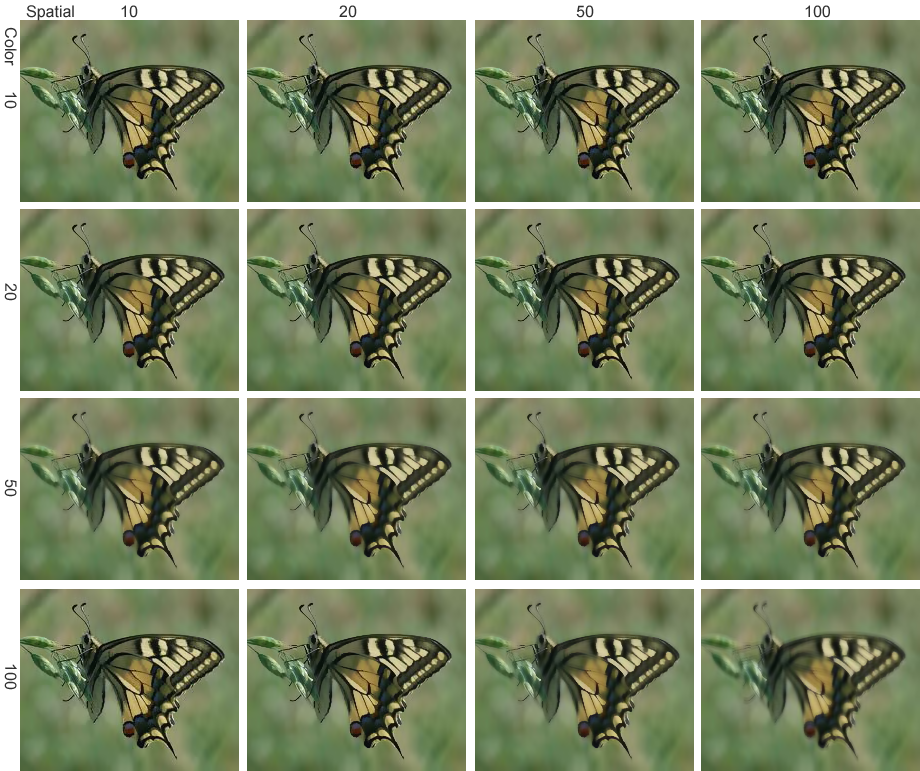


Image samples

Original

Kernel = 13, Color = 20, Spatial = 50

Original
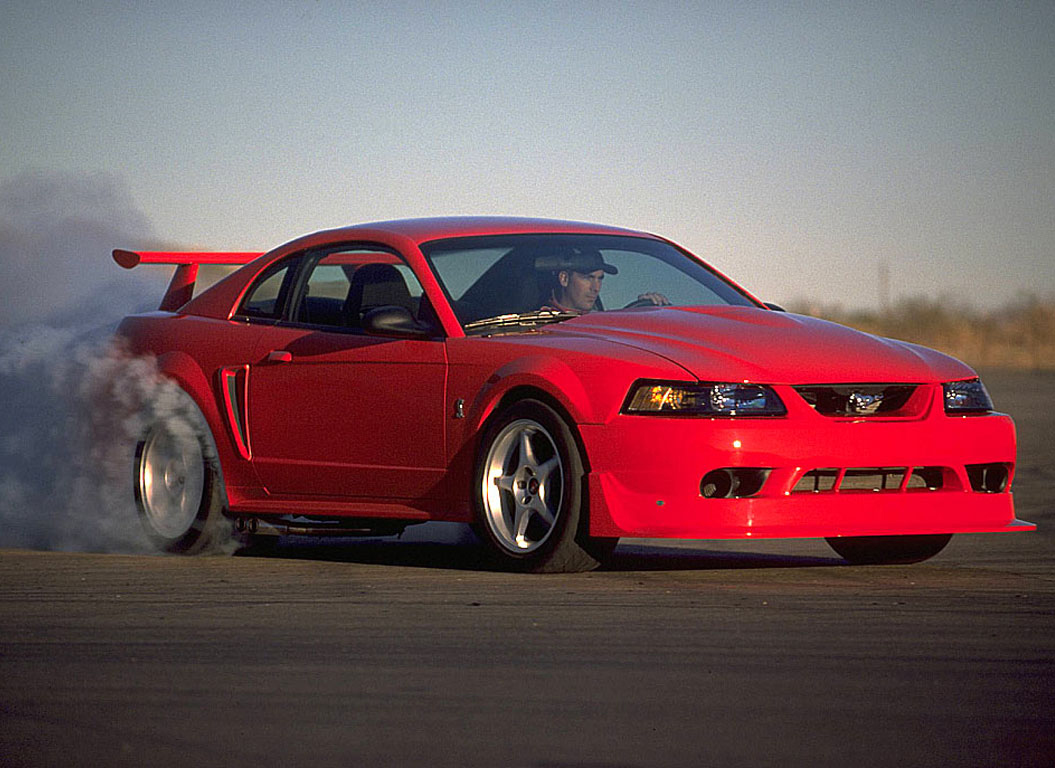
Kernel = 15, Color = 7, Spatial = 70 (noise reduction)

Kernel = 19, Color = 20, Spatial = 100 (adding blurry effect)

Original

Kernel = 21, Color = 7, Spatial = 100 (noise reduction)

Kernel = 21, Color = 21, Spatial = 100 (adding blurry effect)

Original
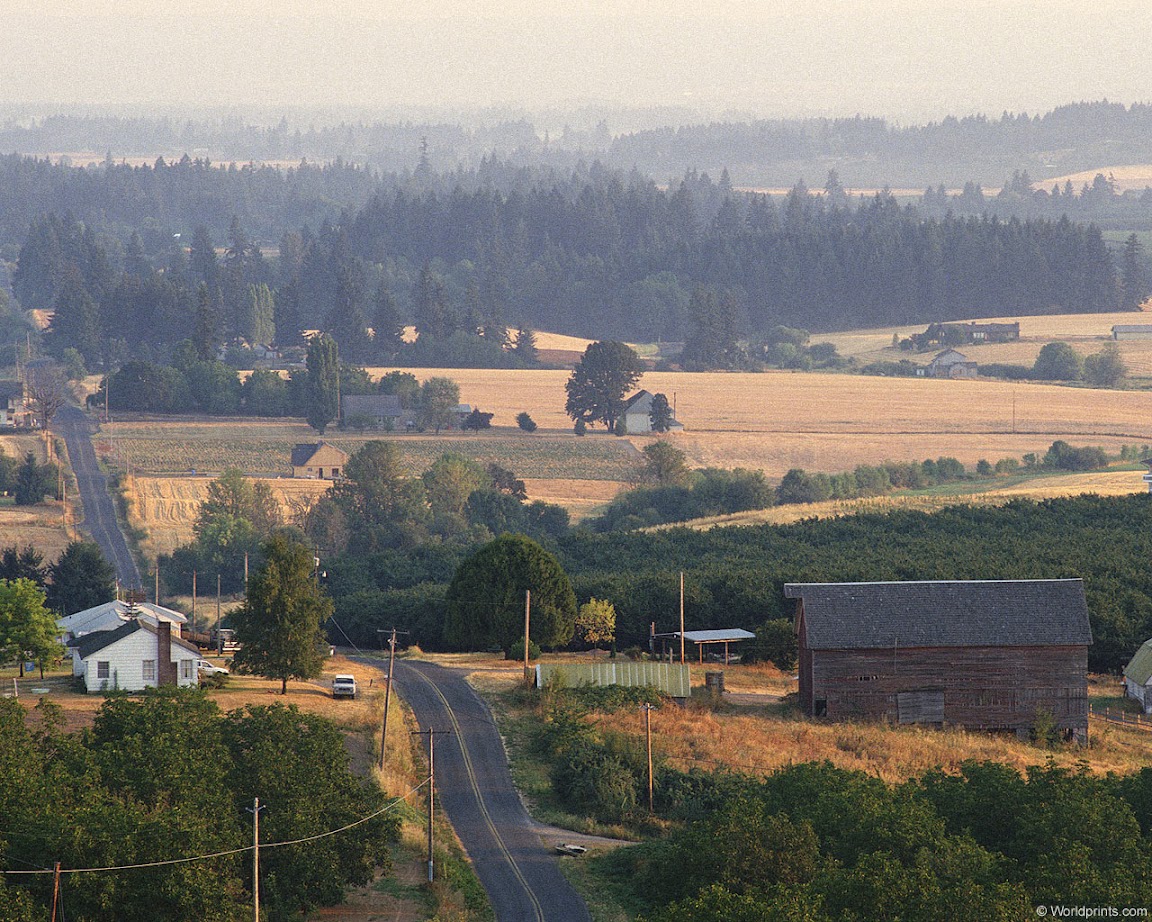
Kernel = 25, Color = 10, Spatial = 70 (noise reduction)
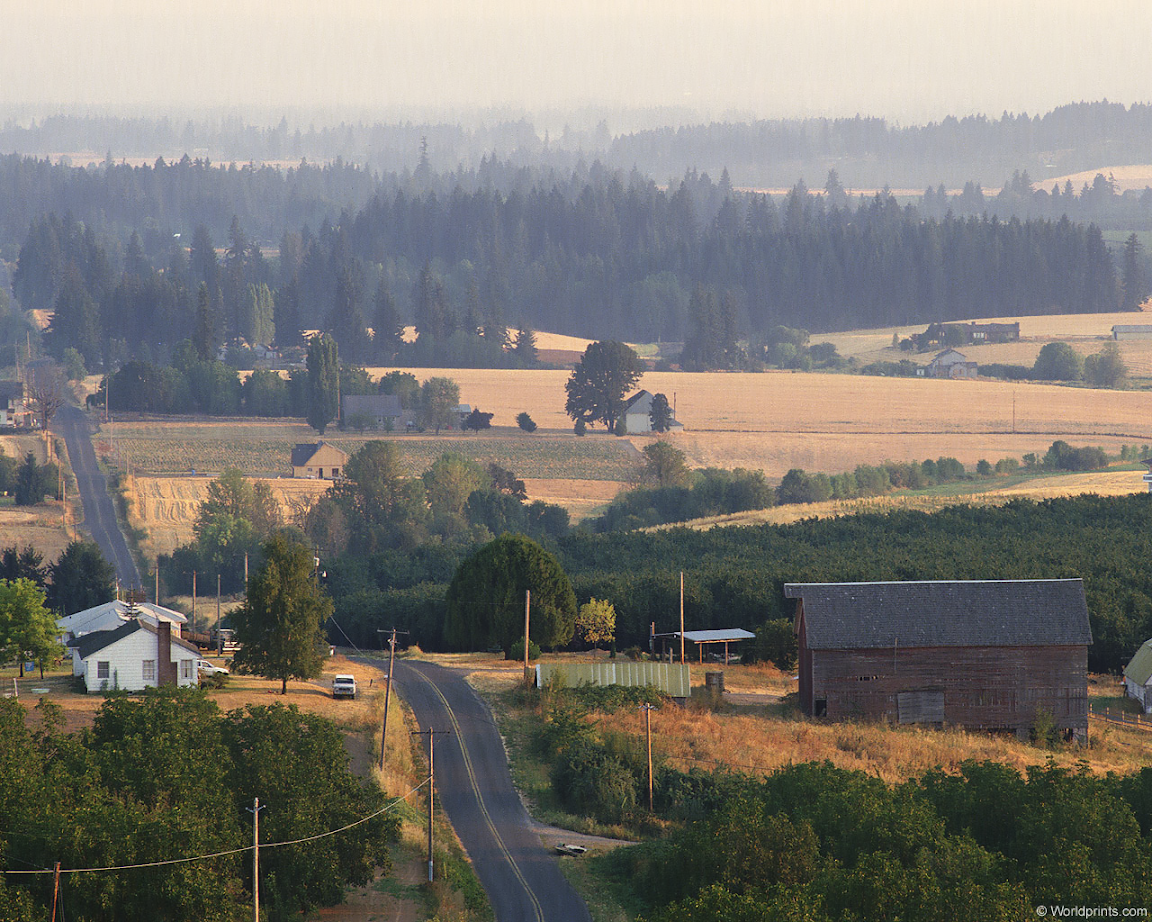
Kernel = 25, Color = 20, Spatial = 70 (adding blurry effect)
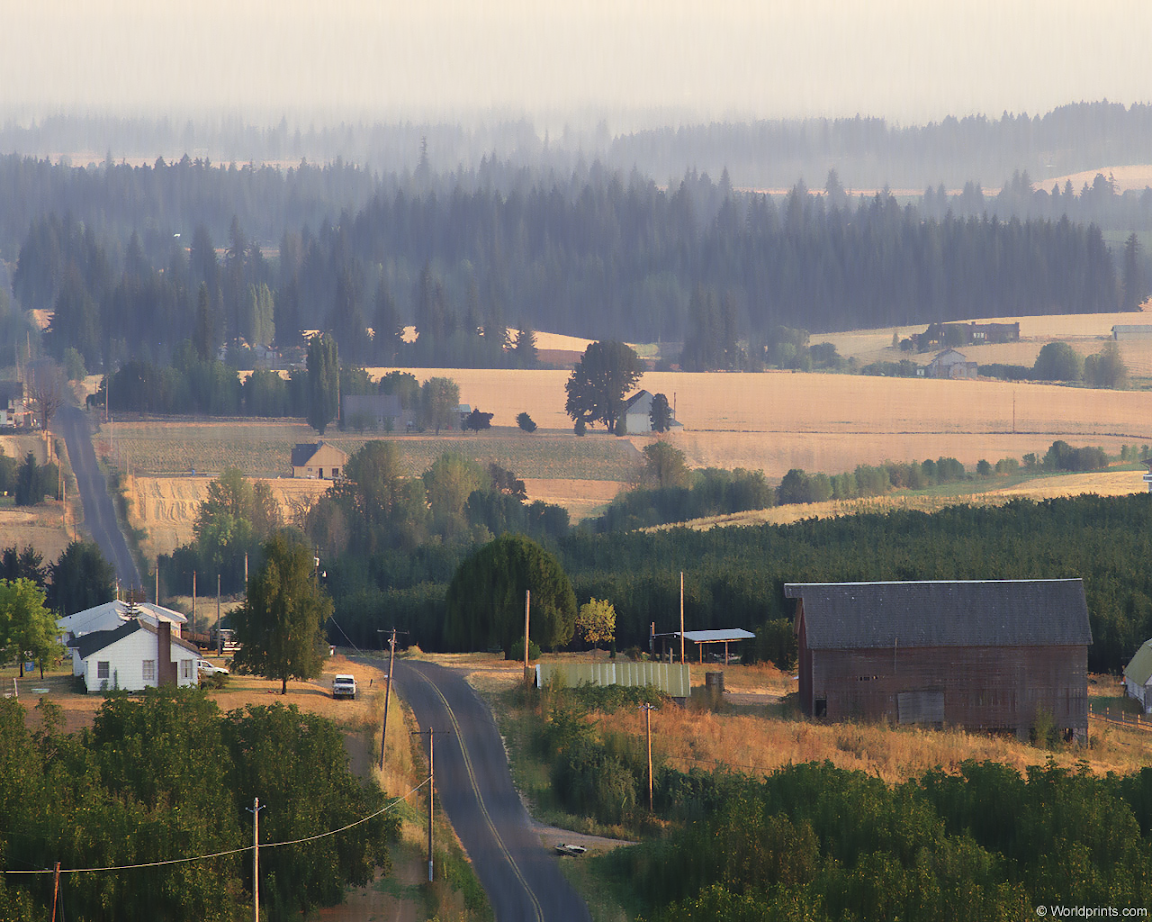
Original
Kernel = 25, Color = 20, Spatial = 70 (adding blurry effect)